UIAutomator2 简明教程
¶简介
uiautomator2是一个自动化测试开源工具,仅支持android平台的自动化测试,其封装了谷歌自带的uiautomator2测试框架,可以运行在支持Python的任一系统上,目前版本为2.10.2
开源库地址:https://github.com/openatx/uiautomator2
¶工作原理
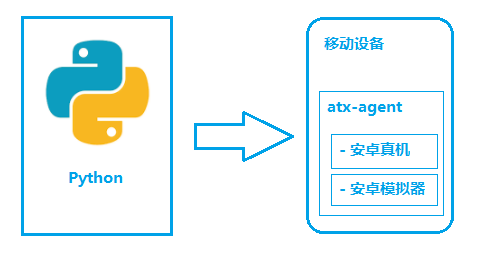
如图所示,python-uiautomator2主要分为两个部分,python客户端,移动设备
- python端: 运行脚本,并向移动设备发送HTTP请求
- 移动设备:移动设备上运行了封装了uiautomator2的HTTP服务,解析收到的请求,并转化成uiautomator2的代码。
整个过程
- 在移动设备上安装atx-agent(守护进程), 随后atx-agent启动uiautomator2服务(默认7912端口)进行监听
- 在PC上编写测试脚本并执行(相当于发送HTTP请求到移动设备的server端)
- 移动设备通过WIFI或USB接收到PC上发来的HTTP请求,执行制定的操作
¶安装与启动
¶安装uiautomator2
使用pip安装pip install -U uiautomator2
安装完成后,使用如下python代码查看环境是事配置成功
说明:后文中所有代码都需要导入uiautomator2库,为了简化我使用u2代替,d代表driverimport uiautomator2 as u2
# 连接并启动
d = u2.connect()
print(d.info)
能正确打印出设备的信息则表示安装成功
注意:需要安装 adb 工具,并配置到系统环境变量,才能操作手机
安装有问题可以到https://github.com/openatx/uiautomator2/wiki/Common-issues这里查看一下有没有相同的问题
¶安装weditor
weditor是一款基于浏览器的UI查看器,用来帮助我们查看UI元素定位。
因为uiautomator是独占资源,所以当atx运行的时候uiautomatorviewer是不能用的,为了减少atx频繁的启停,就需要用到此工具
使用pip安装pip install -U weditor
查看安装是否成功weditor --help
出现如下信息表示安装成功
运行weditorpython -m weditor
#或者直接在命令行运行
weditor
¶连接ADB设备
可以通过USB或Wifi与ADB设备进行连接,进而调用Uiautomator2框架,支持同时连接单个或多个ADB设备。
¶USB连接
只有一个设备也可以省略参数,多个设备则需要序列号来区分import uiautomator2 as u2
d = u2.connect("--serial-here--")
# 一个设备时,可简写
d = u2.connect()
¶无线连接
通过设备的IP连接(需要在同一局域网且设备上的atx-agent已经安装并启动)d = u2.connect("10.1.2.3")
通过ABD wifi 等同于下面的代码d = u2.connect_adb_wifi("10.0.0.1:5555")
#等同于
+ Shell: adb connect 10.0.0.1:5555
+ Python: u2.connect_usb("10.0.0.1:5555")
¶Driver管理
¶获取driver信息
d.info |
{ |
¶获取设备信息
会输出测试设备的所有信息,包括电池,CPU,内存等d.device_info
# 输出如下{
"udid": "61c90e6a-ba:1b:ba:46:91:0e-freedom_turbo_XL",
"version": "10",
"serial": "61c90e6a",
"brand": "Schok",
"model": "freedom turbo XL",
"hwaddr": "ba:1b:ba:46:91:0e",
"port": 7912,
"sdk": 29,
"agentVersion": "0.9.4",
"display": {
"width": 1080,
"height": 2340
},
"battery": {
"acPowered": false,
"usbPowered": true,
"wirelessPowered": false,
"status": 2,
"health": 2,
"present": true,
"level": 98,
"scale": 100,
"voltage": 4400,
"temperature": 292,
"technology": "Li-ion"
},
"memory": {
"total": 5795832,
"around": "6 GB"
},
"cpu": {
"cores": 8,
"hardware": "Qualcomm Technologies, Inc SDM665"
},
"arch": "",
"owner": null,
"presenceChangedAt": "0001-01-01T00:00:00Z",
"usingBeganAt": "0001-01-01T00:00:00Z",
"product": null,
"provider": null
}
¶获取屏幕分辨率
# 返回(宽,高)元组 |
¶获取IP地址
# 返回ip地址字符串,如果没有则返回None |
¶Driver全局设置
¶settings
查看settings默认设置d.settings
#输出
{
#点击后的延迟,(0,3)表示元素点击前等待0秒,点击后等待3S再执行后续操作
'operation_delay': (0, 3),
# opretion_delay生效的方法,默认为click和swipe
# 可以增加press,send_keys,long_click等方式
'operation_delay_methods': ['click', 'swipe'],
# 默认等待时间,相当于appium的隐式等待
'wait_timeout': 20.0,
# xpath日志
'xpath_debug': False
}
修改默认设置,只需要修改settings字典即可#修改延迟为操作前延迟2S 操作后延迟4.5S
d.settings['operation_delay'] = (2,4.5)
#修改延迟生效方法
d.settings['operation_delay_methods'] = {'click','press','send_keys'}
# 修改默认等待
d.settings['wait_timeout'] = 10
¶使用方法或者属性设置
http默认请求超时时间# 默认值60s,
d.HTTP_TIMEOUT = 60
当设备掉线时,等待设备在线时长# 仅当TMQ=true时有效,支持通过环境变量 WAIT_FOR_DEVICE_TIMEOUT 设置
d.WAIT_FOR_DEVICE_TIMEOUT = 70
元素查找默认等待时间# 打不到元素时,等待10后再报异常
d.implicitly_wait(10.0)
打开HTTP debug信息d.debug = True
d.info
#输出
15:52:04.736 $ curl -X POST -d '{"jsonrpc": "2.0", "id": "0eed6e063989e5844feba578399e6ff8", "method": "deviceInfo", "params": {}}' 'http://localhost:51046/jsonrpc/0'
15:52:04.816 Response (79 ms) >>>
{"jsonrpc":"2.0","id":"0eed6e063989e5844feba578399e6ff8","result":{"currentPackageName":"com.android.systemui","displayHeight":2097,"displayRotation":0,"displaySizeDpX":360,"displaySizeDpY":780,"displayWidth":1080,"productName":"freedom_turbo_XL","screenOn":true,"sdkInt":29,"naturalOrientation":true}}
<<< END
休眠# 相当于 time.sleep(10)
d.sleep(10)
¶应用管理
¶获取当前界面的APP信息
d.app_current() |
¶启动应用
# 默认的这种方法是先通过atx-agent解析apk包的mainActivity,然后调用`am start -n $package/$activity`启动 |
¶停止应用
# 等价于`am force-stop`,此方法会丢失应用数据 |
¶获取APP信息
d.app_info('com.xueqiu.android') |
¶获取APP图标
img = d.app_icon("com.examples.demo") |
¶列出所有运行中的APP
d.app_list_running() |
¶等待APP启动
也可以通过Session来判断
# 等待应用运行, return pid(int) |
¶安装APP
可以从本地路径及url下载安装APP,此方法无返回值,当安装失败时,会抛出RuntimeError异常# 本地路径安装
d.app_install('test.apk')
# url安装
d.app_install('http://s.toutiao.com/UsMYE/')
¶卸载APP
# 卸载成功返回true,没有此包或者卸载失败返回False |
卸载全部应用返回的包名列表并一定是卸载成功了,最好使用verbose=true打印一下信息,这样可以查看到是否卸载成功uninstalling com.xueqiu.android OK
uninstalling com.android.cts.verifier FAIL
¶Session操作
一般用于测试某个特定的APP,首先将某个APP设定为一个Session,所有的操作都基于此Session,当Session退出时,代表APP退出。
¶启动应用并获取session
session的用途是操作的同时监控应用是否闪退,当闪退时操作,会抛出SessionBrokenErrorsess = d.session("com.example.app")
¶停止或重启session,即app
sess.close() # 停止app |
¶确定session对应的APP是否运行,当不在运行将报错
# When app is still running |
¶图像操作
用于获取Android当前的截图和界面元素。
¶截图
# 截图并保存到电脑上的文件,要求Android>=4.2。 |
¶录屏
首先需要下载依赖,官方推荐使用镜像下载
pip install -U "uiautomator2[image]" -i https://pypi.doubanio.com/simple
# 启动录制,默认帧率为20 |
¶获取hierarchy
# 获取 UI 层次结构转储内容 (unicode)。 |
¶元素定位
ui2支持 android 中 UiSelector 类中的所有定位方式,详细可以在这个网址查看https://developer.android.com/reference/android/support/test/uiautomator/UiSelector
整体内容如下,所有的属性可以通过weditor查看到
| 名称 | 描述 |
|---|---|
| text | text是指定文本的元素 |
| textContains | text中包含有指定文本的元素 |
| textMatches | text符合指定正则的元素 |
| textStartsWith | text以指定文本开头的元素 |
| className | className是指定类名的元素 |
| classNameMatches | className类名符合指定正则的元素 |
| description | description是指定文本的元素 |
| descriptionContains | description中包含有指定文本的元素 |
| descriptionMatches | description符合指定正则的元素 |
| descriptionStartsWith | description以指定文本开头的元素 |
| checkable | 可检查的元素,参数为True,False |
| checked | 已选中的元素,通常用于复选框,参数为True,False |
| clickable | 可点击的元素,参数为True,False |
| longClickable | 可长按的元素,参数为True,False |
| scrollable | 可滚动的元素,参数为True,False |
| enabled | 已激活的元素,参数为True,False |
| focusable | 可聚焦的元素,参数为True,False |
| focused | 获得了焦点的元素,参数为True,False |
| selected | 当前选中的元素,参数为True,False |
| packageName | packageName为指定包名的元素 |
| packageNameMatches | packageName为符合正则的元素 |
| resourceId | resourceId为指定内容的元素 |
| resourceIdMatches | resourceId为符合指定正则的元素 |
¶子元素和兄弟定位
sibling()#查找与google同一级别,类名为android.widget.ImageView的元素
d(text="Google").sibling(className="android.widget.ImageView")
链式调用d(className="android.widget.ListView", resourceId="android:id/list") \
.child_by_text("Wi‑Fi", className="android.widget.LinearLayout") \
.child(className="android.widget.Switch") \
.click()
¶相对定位
相对定位支持在left, right, top, bottom,即在某个元素的前后左右d(A).left(B),# 选择A左边的B
d(A).right(B),# 选择A右边的B
d(A).up(B), #选择A上边的B
d(A).down(B),# 选择A下边的B
#选择 WIFI 右边的开关按钮
d(text='Wi‑Fi').right(resourceId='android:id/widget_frame')
¶元素常用API
表格标注有@property装饰的类属性方法,均为下方示例方式d(test="Settings").exists
| 方法 | 描述 | 返回值 | 备注 |
|---|---|---|---|
| exists() | 判断元素是否存在 | True,Flase | @property |
| info() | 返回元素的所有信息 | 字典 | @property |
| get_text() | 返回元素文本 | 字符串 | |
| set_text(text) | 设置元素文本 | None | |
| clear_text() | 清空元素文本 | None | |
| center() | 返回元素的中心点位置 | (x,y) | 基于整个屏幕的点 |
exists其它使用方法:d.exists(text='Wi‑Fi',timeout=5)
info()输出信息:{
"bounds": {
"bottom": 407,
"left": 216,
"right": 323,
"top": 342
},
"childCount": 0,
"className": "android.widget.TextView",
"contentDescription": null,
"packageName": "com.android.settings",
"resourceName": "android:id/title",
"text": "Wi‑Fi",
"visibleBounds": {
"bottom": 407,
"left": 216,
"right": 323,
"top": 342
},
"checkable": false,
"checked": false,
"clickable": false,
"enabled": true,
"focusable": false,
"focused": false,
"longClickable": false,
"scrollable": false,
"selected": false
}
可以通过上方信息分别获取元素的所有属性
¶XPath定位
因为Java uiautoamtor中默认是不支持xpath,这是属于ui2的扩展功能,速度会相比其它定位方式慢一些
在xpath定位中,ui2中的description 定位需要替换为content-desc,resourceId 需要替换为resource-id# 只会返回一个元素,如果找不到元素,则会报XPathElementNotFoundError错误
# 如果找到多个元素,默认会返回第0个
d.xpath('//*[@resource-id="com.android.launcher3:id/icon"]')
# 如果返回的元素有多个,需要使用all()方法返回列表
# 使用all方法,当未找到元素时,不会报错,会返回一个空列表
d.xpath('//*[@resource-id="com.android.launcher3:id/icon"]').all()
¶设备交互
¶单击
# XY坐标 |
¶长按
d.long_click(x, y) |
¶滑动操作
¶基于坐标
# 从(10, 20)滑动到(80, 90) |
¶基于元素
d(text="Settings").swipe("right") |
¶基于整个屏幕
# 支持前后左右的滑动 |
¶拖动
# 从一个坐标拖拽到另一个坐标 |
¶模拟按下后的连续操作
如九宫格解锁
# 模拟按下 |
¶模拟两指缩放
Android >= 4.3
# 缩小 |
¶等待元素出现或者消失
# 等待元素出现 |
¶滚动界面
设置scrollable属性为True
滚动类型:horiz 水平,vert 为垂直
滚动方向:forward 向前,backward 向后
- toBeginning 滚动至开始
- toEnd 滚动至最后
- to 滚动直接某个元素出现
所有方法均返回Bool值# 垂直滚动到页面顶部
d(scrollable=True).scroll.toBeginning()
# 横向滚动到最左侧
d(scrollable=True).scroll.horiz.toBeginning()
# 垂直滚动到页面最底部
d(scrollable=True).scroll.toEnd()
# 横向滚动到最右侧
d(scrollable=True).scroll.horiz.toEnd()
# 垂直向后滚动到指定位置
d(scrollable=True).scroll.to(description="指定位置")
# 横向向右滚动到指定位置
d(scrollable=True).scroll.horiz.to(description="指定位置")
# 垂直向前滚动(横向同理)
d(scrollable=True).scroll.forward()
# 垂直向前滚动到指定位置(横向同理)
d(scrollable=True).scroll.forward.to(description="指定位置")
# 滚动直到System元素出现
d(scrollable=True).scroll.to(text="System")
¶文件导入导出
导入文件# 如果是目录,这里"/sdcrad/"最后一个斜杠一定要加,否则会报错
d.push("test.txt","/sdcrad/")
d.push("test.txt","/sdcrad/test.txt")
导出文件d.pull('/sdcard/test.txt','text.txt')
¶执行Shell命令
执行非阻塞命令# 返回输出和退出码,正常为0,异常为1
# output返回的是一个整体的字符串,如果需要抽取值,需要对output进行解析提取处理
output, exit_code = d.shell(["ls","-l"],timeout=60)
12
执行阻塞命令(持续执行的命令)# 返回一个命令的数据流 output为requests.models.Response
output = d.shell('logcat',stream=True)
try:
# 按行读取,iter_lines为迭代响应数据,一次一行
for line in output.iter_lines():
print(line.decode('utf8'))
finally:
output.close()
¶打开通知栏与快速设置
# 打开通知栏 |
¶模拟输入
需要光标已经在输入框中才可以
# 切换成FastInputIME输入法 |
¶清空输入框
d.clear_text() |
¶亮灭屏
# 亮屏 |
¶屏幕方向
# 设置屏幕方向 |
value 值参考,任意一个值就可以# 正常竖屏
(0, "natural", "n", 0),
# 往左横屏,相当于手机屏幕顺时针旋转90度
# 现实中如果要达到此效果,需要将手机逆时针旋转90度
(1, "left", "l", 90)
# 倒置,这个需要看手机系统是否支持,倒过来显示
(2, "upsidedown", "u", 180)
# 往右横屏,调整与往左相反,屏幕顺时针旋转270度
(3, "right", "r", 270)
¶硬按键操作
用于模拟用户对手机硬按键或系统按键的操作。
¶模拟按 Home 或 Back 键
目前支持以下关键字,但并非所有设备都支持:
- home
- back
- left
- right
- up
- down
- center
- menu
- search
- enter
- delete ( or del)
- recent (recent apps)
- volume_up
- volume_down
- volume_mute
- camera
- power
d.press("back") |
¶模拟按Android定义的硬键值
d.press(0x07, 0x02) |
¶解锁屏幕
d.unlock() |